Wednesday, July 20, 2011

Tin Can Treats

Tin Can Treats
Tutorial by Our Best Bites

Supplies:
Supplies:
canned fruit with tab tops, suggested size 7-8oz
candies for filling
tissue paper
hot glue gun
decorative paper
ribbon

1. Use a can opener to remove bottom (non-tab top side) of can, but leave it attached at one point.
2.  Wash cans thoroughly and dry completely.
3.  Fill with candies/treats/trinkets, leaving about 1/2 inch space at top.
4.  Fill remaining space with tissue paper.
5.  Use glue gun to secure lid back to can and let dry completely.
6.  Measure a strip of decorative paper (a child's drawing, marble painting, etc?) the same height as can.  Wrap around the can and secure with tape or glue.
7.  Tie decorative ribbons through the tab on top of can.
8.  Attach tag if desired.

I was thinking these would be a great teacher gift for the beginning of the school year or later on... here's the link for a teacher tag.There are also mother's day tags and father's day tags.

Project from Our Best Bites

Playdoh Lollipops


Ingredients

3/4 cup butter, softened
3 ounces cream cheese
1 cup white sugar
1 egg
1 teaspoon vanilla extract
2 3/4 cups all-purpose flour
1 teaspoon baking powder
1/4 teaspoon salt
assorted colors of paste food coloring
24 lollipop sticks (we used wooden skewers since it's what we had on hand)

Directions

  1. In a bowl cream butter, cream cheese and sugar until fluffy. Add egg and vanilla; beat until smooth.
  2. In a medium bowl combine flour, baking powder and salt. Add dry ingredients to the creamed mixture. Stir till soft dough forms. Divide dough into fourths. Tint each with a different food color. Wrap in plastic wrap and chill for 2 hours.
  3. Preheat oven to 350 degrees F (175 degrees C). Working with half of each color, shape dough into 3/4 inch balls and for each cookie place 1 pink, 1 green, 1 blue and 1 orange ball together to make 1 large ball. Shape into a 12 inch long roll (like a snake), starting at one end, coil roll to make a 2 3/4 inch round cookie. Place cookies 3 inches apart on lightly greased baking sheet. Carefully insert lollipop sticks into bottoms of cookies.
  4. Bake cookies for 8 minutes or until lightly browned. Cool and store in an airtight container.
(I got this recipe from the Entrusted blog and they claimed it came from www.allrecipes.com but so far I haven't been able to find it there.)

Wednesday, June 29, 2011

Quick and Easy Fireworks


Supplies:

black construction paper
cupcake liners
markers
glitter
scissors
glue

Directions:

Color on flattened cupcake liners with the markers. If it's difficult to color and hold the liner then tape the edge with masking tape.

Fold the cupcake liners in half and then in half again so you have somewhat of a triangle shape. Cut slits starting at the widest part. Do not cut all the way to the point or you will cut your liner apart.

Add glue to your black paper or to the back of your cupcake liner and put your fireworks on the black paper.

Add glitter.

Friday, April 8, 2011

Butterflies

Here are a couple of quick, easy and adaptable crafts, using materials that most of us probably already have at home.

Hand print Butterflies


Materials needed:
  • Construction paper
  • Butterfly "body" template
  • Scissors
  • Glue
  • Googly eyes
  • Marker
  • Pompoms
  • Stickers
Help child to assemble the butterfly as shown in picture. If you prefer, instead of tracing their hands on paper, you could actually have them dip their hands into paint and make real hand prints for the wings! You can decorate the wings with sticker, glitter, or even just crayons. If you don't have any pompoms for the body, you could use cotton balls, buttons, or anything else circular you have laying around.

Butterfly Garden


Materials needed:
  • Construction paper
  • Paint
  • Butterfly sponge (I just cut a basic butterfly shape out of a regular rectangular kitchen sponge)
  • White cupcake papers
  • Scissors
  • Glue
  • Markers/crayons
Have child dip sponge into paint and then press onto paper. For the "flowers", have child color the cupcake papers. Caleb wanted to just color the middle of each. After they are done coloring, tear the side of the flowers to give the effect of petals. Or, you could use scissors, or have the child use scissors. Add construction paper stems and leaves.

Monday, March 21, 2011

Coffee Filter Butterflies


Materials Needed:
  • White round coffee filter
  • Watercolor paints
  • Clothes pin
  • Markers
  • Small googley eyes
  • Pipe cleaner
  • Yarn
  • Glue gun
Procedure:
  1. Flatten coffee filter so that the child can paint it. Encourage him/her to paint the entire filter. The less white the better. If you're like me, you might have to "let go" of the urge to paint all the white parts that the kiddos did not cover. =)
  2. When child is finished painting, set the filter aside to dry.
  3. While the filter is drying, have the child use markers, or more paint, to color the clothespin.
  4. Glue googley eyes on to one end of the clothespin. Make sure that the part of the clothespin that clasps is up...that's the end you'll glue the eyes on to.
  5. Form the pipe cleaner into the shape of antennae. Glue this on to the butterfly's "head".
  6. Once the coffee filter is dry, pinch the top and bottom together and use the clothespin to hold it there. "Fan" out the sides until they look like the wings you want them to be.
  7. Optional: Glue yarn to the back of the clothespin to hang it up.


Monday, March 14, 2011

Rainbows


Here are 2 rainbow projects we did, and both kids enjoyed them very much!

1. Paper Squares Rainbow


Supplies Needed:
  • White poster board
  • Construction paper
  • Cotton balls
  • White card stock
  • Scissors
  • Glue
Prep Work:
  • Cut rainbow shape out of poster board.
  • Cut 2-inch (or so) squares out of colored construction paper.
  • Cut 2 cloud shapes out of white card stock.
Procedure:
  1. Have the kids glue on the squares. Depending on the age/development of the kids, you can either have them put the glue on, or you can do the glue and then have them place the paper squares on the glue.
  2. Have kids glue cotton balls to the pre-cut clouds.
  3. Glue clouds on to each end of the rainbow.
  4. Label each color arc with the name of the color.
Important things the kids can learn:
  • Facts about rainbows (you can talk about the color order, how a rainbow is formed, etc.)
  • Spiritual significance of a rainbow (Genesis 9:12-17)
  • Color identification
  • Color word recognition
2. Noah's Ark


Supplies Needed:
  • Paper plate
  • Brown construction paper cut into a half circle, the same size as half of the paper plate you are using
  • Paint and paintbrushes
  • Stickers
  • Glue
Procedure:

1. Have the child paint a rainbow in the top half of the paper plate. If you have a little one,
like I do, the rainbow might look more like this, and that's okay.=):


2. Glue the brown "ark" on the bottom half of the plate.
3. Have kids pick out animal stickers to put on the ark. Caleb was a bit concerned that there
was no Noah, so you could always add him as well (a sticker or an image printed off of the
computer). If possible, include 2 of each animal, to stress that important part of the story!

Important things the kids can learn:
  • Story of Noah and the Ark (Genesis 6-9)
  • Color identification
  • Order of colors in a rainbow
I got the idea for the Noah's Ark craft from here. I modified it to what would work for my kids (ie: stickers instead of animals printed off the computer that needed to be colored), as well as to what materials we had (ie: no brown paint, so we used construction paper).

Tuesday, February 15, 2011

Tissue Paper Flowers


Supplies:

-tissue paper
-green pipe cleaners
-scissors
-ruler (optional)


Directions:
-Cut a few pieces tissue paper into roughly 5x7 inches pieces. Exact size is not important, the bigger your pieces the bigger the flower. The more pieces the fuller the flower, 15 pieces is often suggested.
-Stack the pieces of tissue paper. Use the same color or different colors.
-Accordion pleat the tissue paper working from the long side.
-Wind one end of the pipe cleaner around the middle of the pleated tissue paper.
-Trim the ends of each side to give the petals a unique look. (Trim to a point or rounded for example.)
-Gently separate each layer pulling upwards toward the middle of the flower on one side, then the other.
Tip: If you want your flower to have some leaves, place a small stack (maybe 2-6 sheets) of green tissue paper on top of your other stack before folding. Trim the green paper into the shape of a leaf.

Marble Painting


Supplies:
  • Paint: fingerpaints or Crayola washable kids' paints work well.
  • Small cups or bowls: one for each color you plan to use
  • Box: shoeboxes or any box with a lid (I did not use a lid and it was fine)
  • Paper: small enough to lay flat inside the shoebox
  • Marbles or small balls
  • Tape
How to make:
  1. Cut a piece of paper small enough to fit inside the box.
  2. Tape the piece of paper to the bottom of the box. The best way to do this is to make a circle out of the tape, with sticky side on the outside. Put the tape on the bottom of the box and place paper on top of it.
  3. Pour a small amount of paint into the cup or bowl.
  4. Place 1 marble or ball inside each cup of paint.
  5. Ensure the marble is covered with paint.
  6. Place 1 marble on top of piece of paper.
  7. Put lid on the box.
  8. Shake the box.
  9. Remove lid and marble.
  10. Repeat steps 6-9 until all colored marbles have been used.
  11. Set aside to dry.

Tuesday, December 7, 2010

My Favorite Craft Supply

Reynolds® Freezer Paper
This stuff is awesome. My mom introduced this to me when I was trying to cut a pattern for a sewing project. Then as I started doing more crafts with Jack, I realized how useful this paper could be. I use it for almost every project we do. One side is plastic coated which makes it great to put down on the table while your child works on something messy. Makes clean-up so easy. We also use it just as big paper to color on or the plastic side would be good for finger painting or pudding painting. I'm also using it for our homemade wrapping paper this year. Freezer paper has pretty much found a permanent home in my craft supply box.

Monday, December 6, 2010

Handprint Napkins

This one takes a little more time, and depending on your aim, a little less intervention from the kiddos! However, it makes a great keepsake and they will love to see it each year! We did them for Thanksgiving, however I imagine they can be made for any holiday depending on how you use the hand print!

Supplies:

Cloth napkins
Fabric paint
sponge paintbrushes
stamps (optional)

Fold the napkin in half and then in thirds-as you would fold it to place it on a plate for a table setting. Paint or stamp the palm of each child's hand with the fabric paint and apply it to the napkin- centered on the third that is facing up-that way each place has the handprint showing. We then stamped onto the napkin the name of one family member. So my children's handprints were each on their own napkin, and then i used one of their handprints on my napkin and one on kevin's. my sister used her baby's handprint on the napkins for her and her husband. And for my parents we put all of the grandchildren's hand prints on the same napkin. For Thanksgiving, we made the handprints into turkeys, however they could be made into wreaths for Christmas or simply left as a hand print if you wish. We also embellished the corners of the napkins with stamps as well- you can really get as creative as you wish!

creation story craft

This is an easy craft for kids to get them familiar with the story of creation in Genesis. It takes a little preparation on the part of mommy-unless you have really patient kids! However, its a tangible way for them to remember the order of creation!

Supplies:
Construction or Craft paper
Glue
Pictures for the phases of the story: examples: yellow paper/light blue paper for light, sun and moon, plants and animals (i used the foam animal stickers)

I read through the story with them and as we did each day's creation i had them add onto their paper the piece of the story we just read. I started with black construction paper and attempted, as best as i could explain, how nothing existed. And piece by piece we added everything on the page. I tried to let them have time in between the parts about the plants and the animals and Adam and Eve so they could have freedom to decorate a little more. I also had them add in cotton balls for clouds in the sky, and we glued cut outs of trees and construction paper to look like water and land. You can get as creative as you want with it!

hand ornaments

I haven't started this tradition with my own kids yet, but i plan to this year. However, this was a tradition for many years in my family-until our hands pretty didn't change anymore. ;) I remember taking out the "hands" every year and hanging them on the tree and marveling at how small we all once were! its a great tradition to start when they are small!

Supplies:

Cardboard
Wrapping Paper-or other embellishment
Glue
Ribbons or string to hang them on the tree

Instructions:

Trace each child's hand onto the cardboard and cut it out. Embellish it as you wish, gluing wrapping paper, or having the child decorate it. Make sure you note on the opposite side the child's name and the year! Its a great reminder of how quickly they grow! And this one is not quite as messy as the dough ornaments.

Also a great gift for grandparents-and inexpensive and easy to do multiples!

cookie cutter wrapping paper

Ella and I took on this project-and it turned out to be much easier than i expected, however not as pretty as i had hoped. Ahh, such is crafting with a 4 year-old! But its super easy and a great way to wrap gifts-especially for friends and grandparents-who have much less discriminating wrapping appreciation! And depending on how long you let it last, the clean up isn't too bad.

Cookie Cutter Wrapping Paper:

Large Sheets of Craft Paper-any color
Cookie Cutters
Paint-finger paint, acrylic, fabric-anything that will work on paper!

Use the cookie cutters as stamps and dip them in the paint and stamp them onto the paper. I tried construction paper, and depending on the paint-we used acrylic-it still will show up even on black paper! I suppose you could also decorate fabric as well to use as napkins or gift wrap!


And wrap your gifts! A perfect way to get the kids excited about giving a gift!

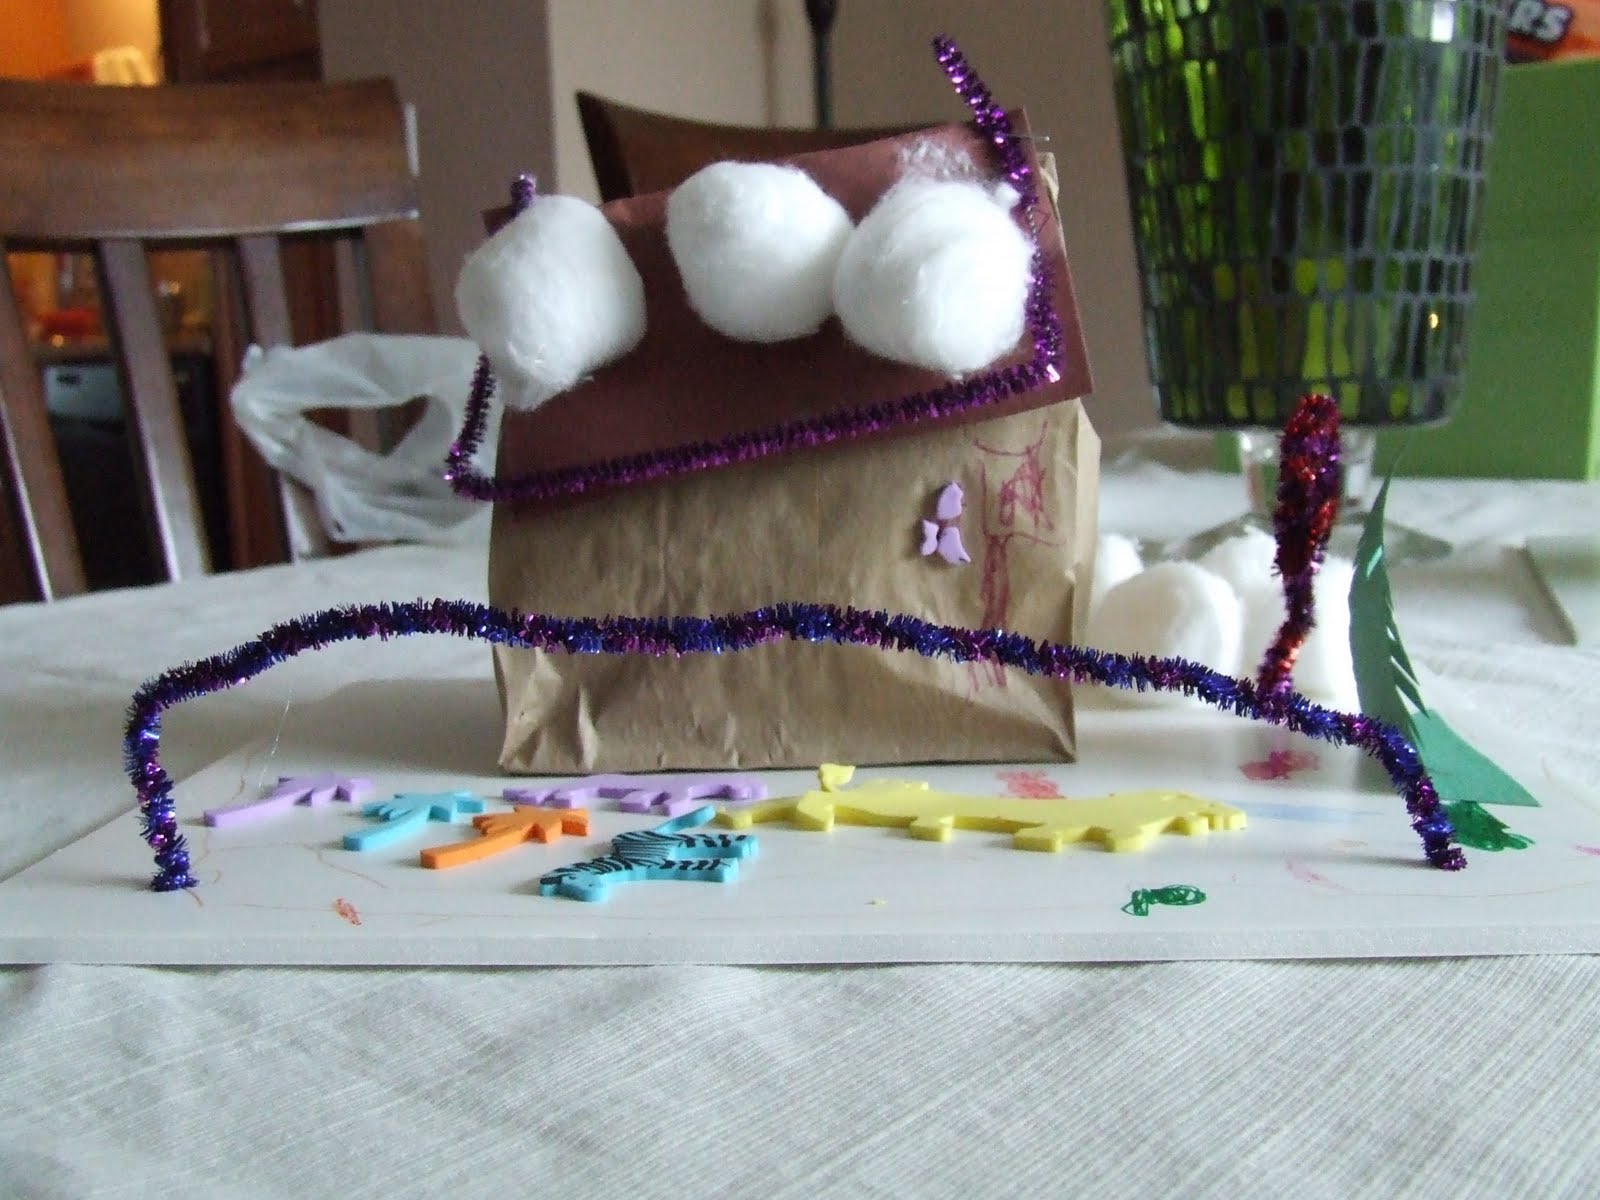
brown paper "gingerbread" houses

we endeavored to make these and while i was envisioning something a little more festive and decorated, i fought every urge to add to them once the children were napping! ;)

i did a single bag version-i didn't glue on a second bag, but we used construction paper and glued it on the top as a roof.

Approximate Time: 1 hour

Supplies:

  • glue
  • 2 paper bags
  • markers
  • paints
  • felt
  • shredded paper
  • pipe cleaners
  • buttons, poms, poms or any misc tidbits you have

Instructions:

First open lunch bag and fill with stuffing,paper, or shredded paper, I used my shredded waste paper. Fold top over like if you had a lunch in it. Staple the fold down on each end. Take second lunch bag leave unopened. Cut off the fold so that the bottom part is off. Glue over the other bag so it resembles a roof.

Now let you imagination go wild. Use any scraps, buttons, felt, poms poms you have to decorate the bag to look like a gingerbread house. We glued our "houses" onto small pieces of foam board so they could also decorate that!

Thursday, December 2, 2010

Potato Stamped Wrapping Paper

You'll need:

  • Paints
  • A sponge, cut in half
  • A potato
  • A knife
  • A marker or pen
  • Paper


Step one

Cut the potato in half. 

Step two

Draw your desired shape on a piece of paper (it helps to trace around the potato face-down on the paper first so you can fit the shape exactly into the potato's circumference. 

Step three

Cut around the shape from the top and a few millimeters down the potato too so the shape rises from the rest of the potato. 

Step four

Place the sponges on a small plate and squirt paint onto each sponge. Let the kids loose with the stamps on a large sheet of butcher's paper or craft paper (we used the Ikea paper rolls). Leave to dry then wrap! 


From: http://www.kidspot.com.au/Christmas-Christmas-crafts-Potato-stamped-wrapping-paper+3708+117+article.htm

Monday, November 29, 2010

Handprint Turkey

Supplies:
Paper Plate
Felt - cut into 1 inch x 1 inch squares (fall colors)
Paint - (used washable poster paint) Brown, Red, Orange, Yellow, Green
Paint Brushes
Googly Eye
Markers
School Glue or craft glue
Hole Puncher & Yarn

Directions
  • Paint child's hand. Paint thumb and palm brown. Paint each finger a different color.
  • Make handprint on plate. (wash their hand)
  • Put line of glue around edge of plate. 
  • Place felt on glue to create "frame"
  • Add turkey features - such as legs and beak and googly eye
  • Hole punch and hang with yarn

This project is a slight variation to project found here.

Wednesday, November 17, 2010

Mud Dough


Pre-School Crafts

This is a preschool idea for a play dough called Mud Dough.
It is best to do this at a large work table so that all the children can watch and help to stir the dough. They will also get a chance to knead the dough—always a hit with this age group. You will need ½ cup of cold water, 1 tablespoon cooking oil, 2 tablespoons brown tempera paint, ½ cup of salt, 1 tablespoon cornstarch and 1 ½ cups of white flour. You can decide how much of the measuring and pouring can be done by your kids depending on their abilities. Put all of the ingredients in a large bowl to stir together and then turn it out onto the table to knead until it is totally mixed. This really resembles mud and the children enjoy using their Mud Dough to make shapes. Tell them they can make animal shapes, like the ones they might find in a zoo. It always helps to have cookie cutters available to help with this especially for the younger children.

Tissue Paper Sculpture

Have the children tear tissue paper into small pieces. Size and shape don’t matter so this is perfect for this age. In a small bowl mix equal parts of glue and water. Show them how to crumple the paper into wads, and then dip these wads of colorful paper into the glue and stick it onto a piece of cardstock or cardboard. They can create their own sculpture!

Homemade Decoupage Paste

If you're in need of some decoupage paste but don't have any on hand and don't have time to get some, try this simple homemade recipe.

Supplies:
-Elmer's Glue or Tacky Glue
-water
-container (with lid if wanting to store)
-stir stick

Directions:
Mix equal parts of glue and water in your container. Stir until uniform or until you have a milky consistency. Mixture should be paintable but not to thick.

To apply  your decoupage paste, paint a thin layer on the object to be decoupaged and lay your image on top. Smooth out any air bubbles and then paint a thin layer over the image. Layer images for best results.

A sponge-tip craft brush is great for decoupage because it leaves no brush lines or bristles behind.

Tuesday, November 16, 2010

Tissue Paper Turkeys

Jack's 2 feather turkey. He wasn't so interested in making the feathers as he was in gluing.

Micah, Jack and Hailey with their turkeys. As you can see these are cute with 2, 3 or even 5 feathers.
Supplies:
-fall colored tissue paper
-scissors
-construction paper (brown, white, black, yellow, red)
-contact paper
-paper plate
-crayons or paint
-glue stick
-duct tape

1. Cut out parts. Feathers, eyes, beak, hangy red thing, feet, turkey head, paper plate in half and tissue paper squares.
2. Unroll some contact paper and peel back the non-stick side. Place feather outlines on sticky side and recover with non-sticky paper. Cut out around feather leaving a decent sized border to be trimmed later.
3. Assemble feathers: Peel backing from contact paper. With sticky side up place tissue paper squares inside the feather outline. Once finished unroll contact paper again. Peel back the sticky side. Place the decorated feather, sticky side up on the backing. Cover with the sticky paper that you had just unrolled. Trim around edge of feather.
4. Assemble turkey: Either color or paint the paper plate. My goal was to have a brown plate, but the kids had other ideas. Glue the face and feet onto the turkey head and glue the turkey head onto the paper plate. Turn plate over and using duct tape, tape the feathers to the back of the plate. I also used little tape rolls between the feathers and the plate to keep them from falling back too far.

Tissue paper crafts like these can be used for a lot of different things. Just cut an outline and fill it in.